When dealing with technical issues on a Windows PC, it’s important to know how to manage applications efficiently. Outlook, being one of the most widely used email clients, can sometimes encounter glitches or errors that require specific fixes. In this guide, you will learn how to terminate a task using Task Manager, repair or reset Outlook, and even uninstall it if necessary. Additionally, I’ll guide you on how to create a new Outlook profile for a fresh start.
I. Terminating a Task Using Task Manager
Task Manager is a fundamental utility in the Windows operating system that allows users to monitor and manage running applications, processes, and system performance. Here’s how to use it effectively:
1. When to Use Task Manager
- When an application becomes unresponsive.
- To end processes that consume too much CPU, RAM, or disk space.
- As a troubleshooting tool to detect problematic applications.
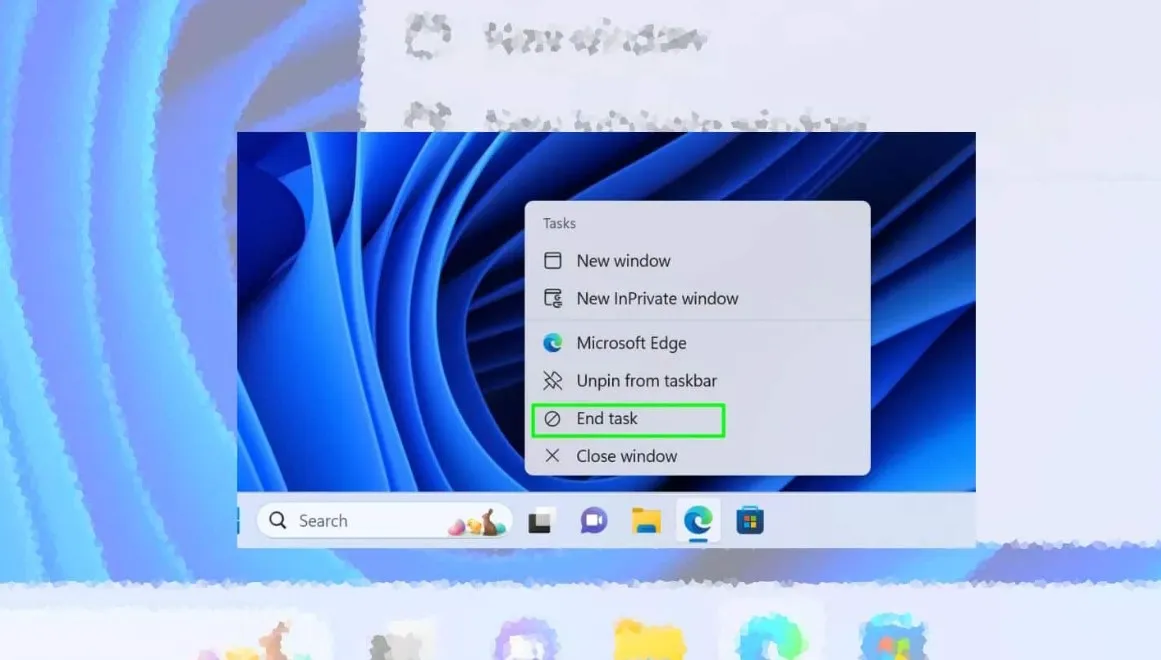
2. Steps to Terminate a Task in Task Manager
- Open Task Manager:
- Press
Ctrl + Shift + Esc. - Alternatively, right-click on the taskbar and select “Task Manager.”
- Press
- Locate the Application or Process:
- Navigate to the Processes tab.
- Look for the application you want to terminate. For example, find “Outlook.exe” if Outlook is causing issues.
- End the Task:
- Select the task.
- Click on the End Task button at the bottom-right corner.
> Pro Tip: Avoid terminating critical system processes marked as “Windows Processes,” as this could destabilize your system.
II. Repairing or Resetting Outlook
Outlook is a robust application, but like any software, it can occasionally require troubleshooting. Common problems include frequent crashes, freezing, or syncing issues. Below are methods to repair or reset it.
1. Using the Office Repair Tool
Microsoft provides an integrated repair option within the Office suite. Follow these steps:
- Open Control Panel:
- Use the search bar in Windows and type “Control Panel.”
- Navigate to Programs and Features:
- Select Uninstall a Program.
- Find Microsoft Office:
- Right-click on it and select Change.
- Choose Repair:
- Two options will appear: Quick Repair and Online Repair.
- Start with Quick Repair; if the issue persists, proceed to Online Repair.
2. Reset Outlook Without Losing Data
- Access Windows Settings:
- Press
Windows + Ito open Settings.
- Press
- Locate the Apps Section:
- Go to Apps > Installed Apps.
- Search for “Outlook.”
- Reset Outlook:
- Click on Advanced Options below Outlook.
- Select Repair or Reset. Repair will retain data, while Reset will wipe the app data.
III. Uninstalling Outlook
Sometimes, a complete uninstallation is necessary when repairing or resetting doesn’t resolve the issue.
1. Manually Uninstalling Outlook
- Open Control Panel:
- Go to Programs > Programs and Features.
- Select Microsoft Office:
- Right-click and choose Uninstall. This will remove Outlook along with the entire Office suite.
- Reinstall Office (Optional):
- Visit Office.com and sign in with your Microsoft account.
- Download and install the latest version of Office.
2. Using a Third-Party Uninstaller
Third-party tools like Revo Uninstaller or CCleaner can remove residual files and registry entries associated with Outlook.
IV. Creating a New Outlook Profile
If Outlook continues to misbehave after reinstalling, creating a new profile can provide a clean slate.
1. Why Create a New Profile?
- Corrupted profiles can prevent Outlook from functioning properly.
- A new profile resets settings and connections to email accounts.
2. Steps to Create a New Outlook Profile
- Open Control Panel:
- Search for Mail in the Control Panel.
- Access Profile Settings:
- Click on Show Profiles in the Mail Setup window.
- Add a New Profile:
- Select Add and enter a name for the new profile.
- Configure Email Account:
- Follow the on-screen instructions to add your email account to the new profile.
- Set as Default Profile:
- Once configured, select the new profile and click Set as Default.
3. Troubleshooting Profile Issues
- Use the built-in Test Account Settings option during email setup.
- Double-check server settings provided by your email provider.
V. Preventative Measures for Maintaining Outlook
To avoid running into issues with Outlook in the future, consider these best practices:
- Regular Updates: Keep Outlook and your operating system updated.
- Monitor Add-ins: Disable unnecessary add-ins that may slow down performance.
- Backup Data: Use the export feature to back up your emails, contacts, and calendar.
- Optimize Storage: Delete old emails or move them to an archive to reduce PST/OST file size.
Conclusion
Knowing how to terminate tasks, repair or reset Outlook, and even create a new profile equips you with valuable tools for troubleshooting. Whether you’re managing your personal emails or navigating complex work communications, these methods ensure a smoother experience with Outlook. By following this guide, you’ll be able to resolve most issues independently, saving time and effort.